Imagine biting into a crispy chocolate cone, the rich cocoa melting in your mouth, as an explosion of vibrant, juicy fruits dances on your palate. The sweet aroma wafts through the air, beckoning you to indulge in this delightful treat that screams summer and joy with every delicious bite.
Growing up, my fondest memories revolve around family gatherings where these Fruit-Filled Chocolate Cones stole the show, leaving us all giggling with sticky fingers and chocolate-smudged smiles. Perfect for parties or a sunny afternoon snack, these cones promise a flavor experience that will have you reaching for seconds—and maybe thirds—before you even realize what happened!
Why Does Everyone Love Fruit-Filled Chocolate Cones?
Indulge in a delightful combination of rich dark chocolate and fresh, vibrant fruits that make this treat irresistible!
Perfectly designed for any occasion, these cones are a hit at parties or as a fun family dessert.
Quick to prepare, you’ll whip them up in just 25 minutes—ideal for busy weeknights.
Versatile, you can mix and match your favorite fruits like strawberries, kiwi, and bananas for endless flavor possibilities.
Crowd-pleaser, both kids and adults will adore the whimsical presentation and delicious taste!
Fruit-Filled Chocolate Cones Ingredient List
For the Chocolate Coating
- 200 grams dark chocolate (chopped) – Use high-quality chocolate for a rich flavor and smooth texture in your Fruit-Filled Chocolate Cones.
- 1 tablespoon coconut oil (optional, for smoothness) – Adding coconut oil helps achieve a glossy finish and smoother melting chocolate.
For the Fruit Filling
- 1 cup strawberries (sliced) – Fresh strawberries add sweetness and vibrant color to your cones.
- 1 cup kiwi (peeled and diced) – Kiwi brings a tangy twist and beautiful green contrast to the mix.
- 1 cup blueberries – These juicy berries provide a burst of flavor and antioxidants in every bite.
- 1 cup banana (sliced) – Creamy banana slices enhance the sweetness and pair perfectly with the chocolate.
For the Ice Cream Cones
- 4 pieces ice cream cones – Choose your favorite cone type for a delightful crunch that complements the creamy filling.
Instructions for Making Delicious Chocolate Treats
1. Melt the dark chocolate and coconut oil in a double boiler until smooth. Stir gently to combine, ensuring the mixture is glossy and free of lumps—this should take about 5 minutes on low heat.
2. Dip the ice cream cones into the melted chocolate, ensuring they are fully coated. Hold each cone by the tip and swirl it in the chocolate, then place them upside down on a baking sheet lined with parchment paper.
3. Refrigerate the coated cones for about 10 minutes or until the chocolate hardens. You want to see a nice, firm coating that will keep your sweet treats intact!
4. Fill each cone with a mix of the prepared fruits: strawberries, kiwi, blueberries, and banana slices. Let your creativity shine as you layer these colorful fruits for a delightful presentation!
5. Serve immediately and enjoy your fruit-filled chocolate cones! These are perfect for sharing—or savoring all on your own.
Optional: Drizzle extra melted chocolate on top for an indulgent touch!
Exact quantities are listed in the recipe card below.
Expert Tips
- Chocolate Temperature: Make sure the chocolate isn’t too hot when dipping; it can cause the cones to become soggy if overheated.
- Coconut Oil Magic: Adding coconut oil to the chocolate helps achieve a smoother texture, making it easier to coat the cones evenly.
- Filling Balance: Use a mix of fruits for flavor and color. Avoid overstuffing to prevent spills while enjoying your fruit-filled chocolate cones.
- Chill Time Matters: Don’t skip the chilling step! It ensures the chocolate hardens properly, providing a satisfying crunch when you bite in.
- Cone Selection: Choose sturdy ice cream cones. Waffle cones add extra flavor and hold up better against the fruit filling.
Best Ways to Store Your Treats

- Room Temperature: Enjoy your Fruit-Filled Chocolate Cones fresh for up to 2 hours at room temperature for the best flavor and texture.
- Fridge: Store uneaten cones in an airtight container in the fridge for up to 3 days. This helps keep the fruit fresh while preventing chocolate from melting.
- Freezer: For longer storage, freeze the filled cones. Wrap them individually in plastic wrap and store in a freezer-safe bag for up to 1 month. Thaw in the fridge before serving.
- Reheating: If you prefer a warm treat, gently reheat the chocolate-coated cones in a microwave for about 10 seconds—just enough to soften, not melt!
Personalize Your Chocolate Dessert Creations
Get ready to unleash your creativity and customize these delightful cones to suit your taste buds!
- Milk Chocolate: Replace dark chocolate with milk chocolate for a sweeter, creamier treat that melts in your mouth.
The rich, smooth flavor of milk chocolate pairs beautifully with fresh fruit. Your family will love the nostalgic feel of this classic combination.
- White Chocolate: Swap in white chocolate for a sweeter, more indulgent coating that adds a lovely contrast to tart fruits.
The creamy sweetness of white chocolate will enhance the vibrant flavors of your fruit filling. It’s a unique twist that makes every bite feel like dessert heaven!
- Nut Butter Drizzle: Add a drizzle of almond or peanut butter on top of the chocolate for a nutty flavor boost.
This addition creates an unexpected creamy layer that complements the fruits perfectly. Plus, it adds a satisfying crunch with each bite!
- Spicy Kick: Stir in a pinch of cayenne or chili powder into the melted chocolate for a surprising heat that enhances the sweetness.
This bold twist will awaken your taste buds and create an exciting contrast. It’s perfect for those who love a little adventure in their desserts!
- Minty Fresh: Mix in some crushed peppermint candies or mint extract into your melted chocolate for a refreshing touch.
This variation gives your cones an uplifting aroma and flavor, reminiscent of garden-fresh mint. It’s ideal for summer gatherings and holiday festivities!
- Coconut Flakes: Fold in toasted coconut flakes into the melted chocolate for added texture and tropical flair.
The chewy coconut complements the fruity filling beautifully, transporting you to a beachside paradise with every bite. It’s like taking a vacation without leaving home!
- Zesty Citrus: Add some orange or lemon zest to the melted chocolate for a bright, citrusy twist.
This simple addition elevates the flavor profile, making it more vibrant and refreshing. It’s an excellent way to balance sweetness with tanginess!
Make Ahead Options
Preparing these delightful Fruit-Filled Chocolate Cones is a fantastic option for meal prep enthusiasts! You can make the chocolate coating in advance by melting 200 grams of dark chocolate with 1 tablespoon of coconut oil in a double boiler until smooth. Once your cones are coated, simply dip them and place them upside down on a parchment-lined baking sheet to chill for about 10 minutes. The coated cones will keep well in the refrigerator for up to 3 days. When you’re ready to serve, fill each cone with a mix of fresh fruits like 1 cup of sliced strawberries, 1 cup of diced kiwi, 1 cup of blueberries, and 1 cup of sliced banana. This way, you can enjoy these luscious treats without any last-minute fuss! Just remember to fill them right before serving to maintain that delightful crunch. Enjoy your delicious Fruit-Filled Chocolate Cones anytime!
Common Questions About This Sweet Recipe
What type of chocolate should I use for the coating?
For the best results, opt for high-quality dark chocolate with at least 60% cocoa content. This will provide a rich, deep flavor that perfectly complements the fresh fruits. If you’re looking to make it smoother, adding a tablespoon of coconut oil can help achieve a nice glossy finish.
How long can I store the fruit-filled chocolate cones?
These delightful cones are best enjoyed fresh, but if you need to store them, place them in an airtight container in the refrigerator. They should stay delicious for up to two days. Just keep in mind that the cones may lose some crispness over time due to moisture from the fruit.
Can I freeze fruit-filled chocolate cones?
Yes, you can freeze them! However, it’s important to note that freezing may alter the texture of both the chocolate and the fruit. To freeze, wrap each cone tightly in plastic wrap and place them in an airtight container. They can be frozen for up to one month. When ready to enjoy, let them thaw in the refrigerator for a few hours before serving.
What if my chocolate coating is too thick?
If you find your melted chocolate is too thick for dipping, don’t worry! Simply add another teaspoon or so of coconut oil and stir well until you reach your desired consistency. This will help create a smoother coating that adheres beautifully to your ice cream cones.
How many servings does this recipe yield?
This recipe yields 4 servings, making it perfect for sharing with family or friends. Each cone is approximately 250 calories, which makes for a guilt-free treat that’s both satisfying and refreshing.
Can I substitute any fruits in this recipe?
Absolutely! Feel free to mix and match based on your preferences or seasonal availability. Some great alternatives include diced mangoes, raspberries, or even peaches. Just ensure that any substituted fruits are fresh and cut into similar sizes for consistent filling in your cones.
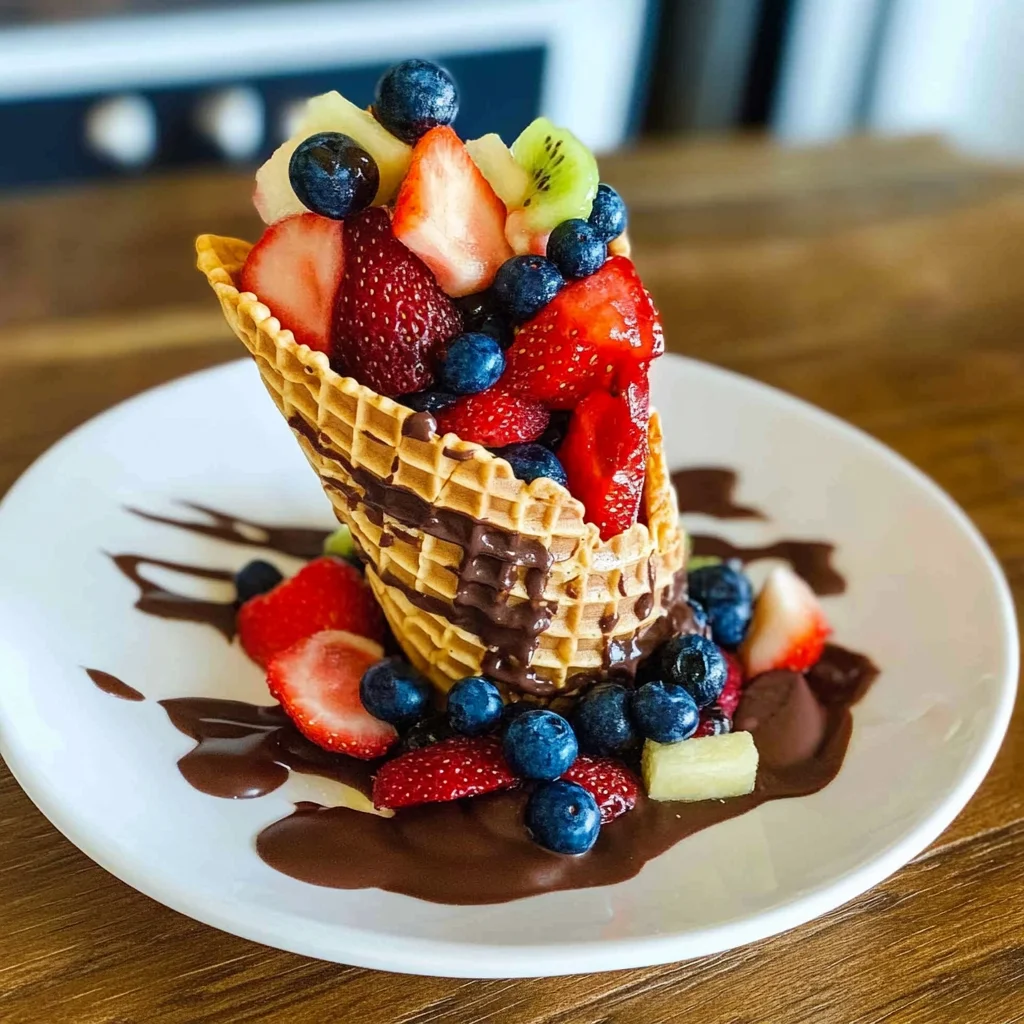
Fruit-Filled Chocolate Cones
Ingredients
Method
- Melt the dark chocolate and coconut oil in a double boiler until smooth.
- Dip the ice cream cones into the melted chocolate, ensuring they are fully coated. Place them upside down on a baking sheet lined with parchment paper.
- Refrigerate the coated cones for about 10 minutes or until the chocolate hardens.
- Once the chocolate has set, fill each cone with a mix of the prepared fruits.
- Serve immediately and enjoy your fruit-filled chocolate cones!