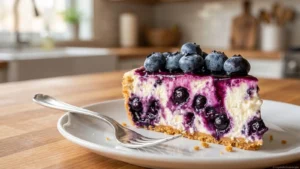
Imagine slicing into a Monet cake, where the vibrant colors of fresh fruits dance atop delicate layers of sponge, each bite offering a symphony of flavors that whisk you away to a sunlit garden. The creamy frosting envelops your senses with its lightness, inviting you to relish not just the taste but the sheer beauty of this culinary masterpiece that feels like a celebration on your plate.
This enchanting cake isn’t just a treat for special occasions; it has a way of turning an ordinary afternoon into an artful escape, reminding me of sunny picnics and laughter shared among friends. Every forkful is a delightful reminder that life’s sweetest moments deserve to be savored, making it the perfect centerpiece for birthdays or casual gatherings where joy and sweetness reign supreme.
Why Is Monet cake So Irresistibly Good?
Delightful layers of light sponge cake make each bite feel like a spring day in a garden. Fresh fruits add vibrant colors and natural sweetness, creating a feast for the eyes and palate. Easy to make, this cake comes together in just over an hour, perfect for gatherings or special occasions. Versatile toppings allow you to customize it with your favorite seasonal fruits, while the whipped cream frosting provides a rich yet delicate finish. Whether you’re an experienced baker or just starting out, this Monet cake will impress your guests and elevate any celebration!
Monet cake Ingredients
For the Cake Base
- 1 cup all-purpose flour – This forms the foundation of your Monet cake, providing a light and fluffy texture.
- 1 cup granulated sugar – Sweetens the cake beautifully, balancing the flavors of the fresh fruits.
- 1 tsp baking powder – Helps the cake rise, giving it that delightful airy lift.
- 1/2 tsp salt – Enhances all the flavors, making your cake taste truly delicious.
- 1/2 cup unsalted butter (softened) – Adds richness and moisture to your cake for a tender crumb.
- 2 large eggs – Binds the ingredients together, contributing to the cake’s structure and flavor.
- 1/2 cup milk – Keeps the batter moist and contributes to a soft texture in your Monet cake.
- 1 tsp vanilla extract – Infuses a warm, sweet aroma that elevates the overall taste.
For the Frosting
- 1 cup heavy cream (chilled) – Whips up beautifully to create a luscious and creamy frosting.
- 1/4 cup powdered sugar – Sweetens the frosting while also helping it maintain its shape.
- 1 tsp vanilla extract – Adds depth of flavor to your frosting, complementing the cake perfectly.
For the Toppings
- 1 cup mixed fresh fruits (such as berries and kiwi) – Brightens your Monet cake with vibrant colors and fresh flavors.
- 2 tbsp edible flowers (for decoration) – Adds an artistic touch reminiscent of Monet’s own masterpieces, making your cake visually stunning.
A Complete Guide to Baking This Delight
1. Preheat the oven to 350°F (175°C). Greasing and flouring your cake pan is essential for a smooth release, ensuring every slice of your beautiful Monet cake comes out perfectly.
2. Whisk together the all-purpose flour, granulated sugar, baking powder, and salt in a mixing bowl. This dry mix should be well combined, inviting that sweet aroma into your kitchen.
3. Add the softened unsalted butter, large eggs, milk, and vanilla extract to the dry ingredients. Mix until smooth and creamy; this batter will create a light and airy sponge that’s simply delightful.
4. Pour the batter into the prepared cake pan, spreading it evenly. Bake for 25 minutes or until a toothpick inserted in the center comes out clean—a golden hue should greet you when you open the oven!
5. Cool the cake completely before frosting. Patience is key here; letting it cool ensures that your frosting won’t melt away into a puddle of sweetness.
For the Frosting:
6. Whip the chilled heavy cream in a mixing bowl until soft peaks form. The texture should be light and fluffy—this will add a lovely richness to your Monet cake.
7. Add the powdered sugar and vanilla extract to the whipped cream. Continue whipping until stiff peaks form; this gives your frosting that perfect body for spreading and decorating.
Assemble the Cake:
8. Spread a layer of frosting generously on top of your cooled cake. Make it as thick or thin as you like—this is where you can get creative with your design!
9. Top with mixed fresh fruits such as berries and kiwi, along with edible flowers for decoration. This colorful display will make your Monet cake truly stunning!
10. Slice and serve your Monet cake to enjoy! Each bite will transport you to an impressionist garden filled with flavor and beauty.
Optional: Garnish with extra edible flowers for an even more enchanting presentation.
Exact quantities are listed in the recipe card below.
Helpful Hints From My Own Kitchen
- Proper Mixing: Ensure all ingredients are at room temperature for a smoother batter and better rise in your Monet cake.
- Flour Measurement: Spoon and level your flour to avoid packing it down, which can lead to a dense cake.
- Baking Time: Always check the cake a few minutes before the timer goes off; ovens can vary, and you want a moist but fully cooked cake.
- Cooling Completely: Patience is key! Let the cake cool completely before frosting to prevent melting and sliding of the cream.
- Whipping Cream: Chill your mixing bowl and beaters to achieve perfect stiff peaks in your whipped cream frosting for that light texture.
- Layering Fruits: Arrange fruits artistically on top without overcrowding to maintain the beautiful impressionist look of your Monet cake.
Storing and Freezing Made Easy
- Room Temperature: Enjoy your Monet cake fresh for up to 1 day, keeping it covered with a cake dome or plastic wrap to retain moisture.
- Fridge: Store leftover slices in an airtight container in the fridge for up to 3 days. This preserves the freshness of the cream and fruits.
- Freezer: For longer storage, freeze individual slices wrapped tightly in plastic wrap and aluminum foil for up to 2 months. Thaw in the fridge before serving.
- Frosting Reheating: If you have leftover frosting, store it in the fridge for up to 5 days. Re-whip lightly before using on any new creations!
Personalizing Your Dessert Experience
Feel free to let your creativity shine as you customize this delightful cake with your favorite flavors and textures!
- Gluten-Free: Substitute all-purpose flour with a gluten-free blend for a light, airy cake that’s safe for gluten sensitivities. Just ensure the blend has a good binding agent like xanthan gum.
- Lemon Zest: Add 1 tablespoon of fresh lemon zest to the batter for a bright, zesty flavor that enhances the sweetness. This twist brings a refreshing note that dances on your palate.
- Chocolate Lovers: Replace 1/4 cup of flour with cocoa powder to create a rich chocolate base. This variation adds depth and indulgence, making every slice a decadent treat.
- Nutty Crunch: Fold in 1/2 cup of finely chopped nuts, such as almonds or hazelnuts, into the batter for added texture and flavor. The nutty crunch will elevate each bite, creating a satisfying contrast with the soft sponge.
- Coconut Cream Frosting: Swap heavy cream for coconut cream in the frosting for a tropical twist. This substitution provides a luscious flavor that perfectly complements fresh fruits.
- Spicy Kick: Incorporate 1/2 teaspoon of cinnamon or cardamom into the cake batter for warm undertones. These spices add warmth and complexity, making your Monet cake truly unique.
- Berry Burst: Use pureed fruit like strawberries or raspberries in place of half the milk for extra fruitiness. This will not only enhance flavor but also give your cake a lovely color throughout.
- Vegan-Friendly: Substitute eggs with flaxseed meal (1 tablespoon mixed with 3 tablespoons water) and use plant-based milk and butter. Your cake will be just as tender and delicious while accommodating vegan diets.
Make Ahead Options
Preparing a Monet cake in advance is a delightful way to save time while still impressing your guests with a beautiful and delicious dessert. You can mix the cake base ingredients—1 cup all-purpose flour, 1 cup granulated sugar, 1 tsp baking powder, 1/2 tsp salt, 1/2 cup softened unsalted butter, 2 large eggs, 1/2 cup milk, and 1 tsp vanilla extract—up to 24 hours ahead of baking. Simply whisk together the dry ingredients, add the wet ones, pour the batter into the pan, and bake as directed. The whipped frosting can also be made in advance; just whip the chilled heavy cream with 1/4 cup powdered sugar and 1 tsp vanilla extract until stiff peaks form, then keep it refrigerated for up to three days. For the freshest taste and visual appeal, assemble your Monet cake with mixed fruits and edible flowers just before serving to maintain their vibrant colors. With these make-ahead tips, you’ll have more time to enjoy your gathering while still serving a stunning Monet cake!
Common Questions About the Recipe
How can I ensure my cake has the perfect texture?
To achieve that light and fluffy texture in your Monet cake, be sure to cream the softened butter and sugar together until it’s pale and fluffy before adding the eggs. Also, don’t overmix once you add the dry ingredients; mix just until combined. This will help keep your cake airy!
What’s the best way to store leftover Monet cake?
If you have any slices left, store them in an airtight container in the refrigerator for up to 3 days. For a longer shelf life, you can freeze individual slices wrapped tightly in plastic wrap and then placed in a freezer-safe bag for up to 2 months.
Can I use different fruits for the toppings?
Absolutely! While mixed berries and kiwi add a lovely visual appeal reminiscent of Monet’s paintings, feel free to get creative. Slices of peaches, mangoes, or even pomegranate seeds would work beautifully, adding both flavor and color.
What should I do if my frosting isn’t setting properly?
If your heavy cream isn’t whipping into stiff peaks, make sure it’s thoroughly chilled before you start whipping. If it still doesn’t set, try adding a bit more powdered sugar gradually while whisking; this helps stabilize the frosting. Remember, you want it to hold its shape for that stunning finish!
What’s a good serving size for this cake?
This delightful Monet cake is designed to serve around 4 people comfortably. Each slice contains approximately 320 calories, making it a sweet but not overwhelming treat for family gatherings or special occasions.
Are there any dietary substitutes I can use for this recipe?
Certainly! For a gluten-free version, you can substitute all-purpose flour with a gluten-free baking blend. If you’re looking for a dairy-free option, use almond or oat milk instead of regular milk and coconut cream for frosting—just ensure they’re well-chilled before whipping!
Monet Cake
Ingredients
Method
- Preheat the oven to 350°F (175°C) and grease and flour your cake pan.
- Whisk together the all-purpose flour, granulated sugar, baking powder, and salt in a mixing bowl.
- Add the softened unsalted butter, large eggs, milk, and vanilla extract to the dry ingredients and mix until smooth and creamy.
- Pour the batter into the prepared cake pan and spread it evenly. Bake for 25 minutes or until a toothpick inserted in the center comes out clean.
- Cool the cake completely before frosting.
- Whip the chilled heavy cream in a mixing bowl until soft peaks form.
- Add the powdered sugar and vanilla extract to the whipped cream and continue whipping until stiff peaks form.
- Spread a layer of frosting generously on top of your cooled cake.
- Top with mixed fresh fruits and edible flowers for decoration.
- Slice and serve your Monet cake to enjoy!