Homemade granola bars are a fantastic option for anyone looking to enjoy a nutritious snack without the preservatives and added sugars found in store-bought varieties. These delightful treats make a great breakfast on the go or a satisfying midday snack to keep you energized throughout your busy day. The beauty of making your own granola bars lies in the ability to customize them according to your taste preferences. Whether you prefer nutty flavors, chewy textures, or fruity bursts, the possibilities are endless when you create homemade granola bars. In this article, we will guide you through an easy recipe that combines oats, honey, nuts, and dried fruits to produce delicious results. Not only do these bars provide a wholesome alternative for snacking, but they are also budget-friendly and simple to prepare. With just a handful of ingredients and minimal effort, you’ll have tasty homemade granola bars ready in no time.
Why You’ll Love This Homemade Granola Bars
- Quick and Easy: Minimal prep time and straightforward steps make this recipe stress-free, even for novice cooks
- Flavorful and Versatile: Enjoy outstanding flavor with ingredients you can easily customize by adding your favorites or adjusting spices
- Perfect for Any Occasion: Ideal for casual gatherings, holiday celebrations, or weeknight dinners

Ingredients for Homemade Granola Bars
Here’s what you’ll need to make this delicious dish:
- Rolled Oats: Use old-fashioned rolled oats for the best texture; they hold together well while baking
- Honey or Maple Syrup: Natural sweeteners help bind the ingredients together while adding sweetness; choose according to your taste preference
- Nuts: Chopped almonds, walnuts, or pecans add crunch and healthy fats; feel free to mix different types
- Dried Fruit: Raisins, cranberries or apricots bring natural sweetness and chewiness; chop larger pieces for easier mixing
- Nut Butter: Almond butter or peanut butter enhances flavor and helps bind everything together; opt for natural varieties without added sugar
The full ingredients list, including measurements, is provided in the recipe card directly below.
Get inspired with these delicious options!
A Step-By-Step Guide to Crafting Granola Treats
Follow these simple steps to prepare this delicious dish:
Step 1: Preheat the Oven
Preheat your oven to 350°F (175°C). Line a baking dish with parchment paper for easy removal after baking.
Step 2: Mix Dry Ingredients
In a large bowl, combine rolled oats, chopped nuts, and dried fruit. Stir until evenly distributed.
Step 3: Combine Wet Ingredients
In another bowl, mix honey (or maple syrup) with nut butter until smooth. You can microwave the mixture briefly if needed to help combine.
Step 4: Combine Mixtures
Pour the wet mixture over the dry ingredients. Stir well until all components are coated evenly.
Step 5: Press into Baking Dish
Transfer the mixture into your lined baking dish. Press down firmly using a spatula or your hands to ensure even thickness.
Step 6: Bake
Place in the preheated oven and bake for about 20-25 minutes until golden brown around the edges.
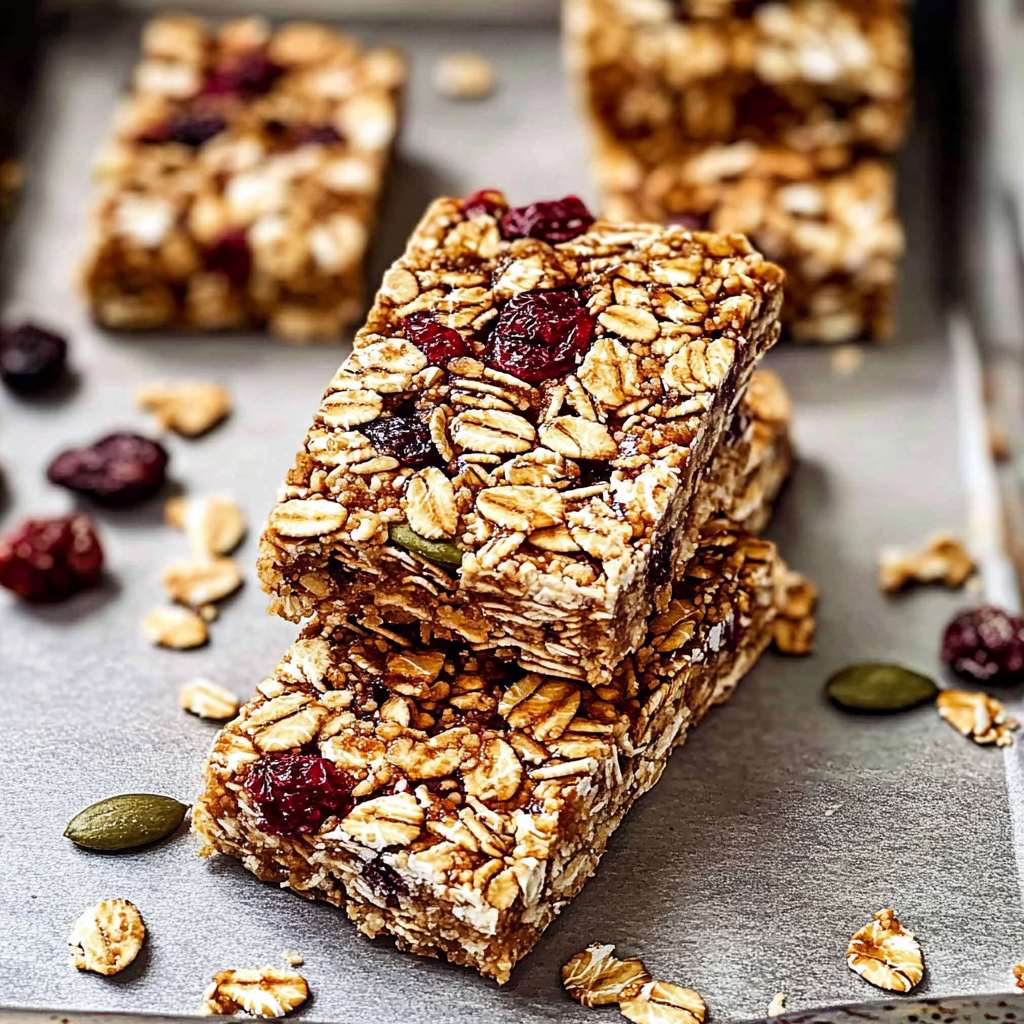
Let cool completely before slicing into bars. Transfer to plates and serve as a nutritious snack!

Hungry for more? See more recipes!
Tips and Tricks
Here are some helpful tips to ensure the best results for your dish:
- Even Mixing: Ensure all ingredients are combined thoroughly to achieve consistent flavor in each bite
- Cooling Time: Allow sufficient cooling time before cutting; this helps maintain their shape
- Add-Ins: Feel free to experiment with add-ins like chocolate chips or coconut flakes for variety
Find your next favorite recipe here!
Best Ways to Enjoy Your Granola Snacks
This Homemade Granola Bars is versatile and pairs wonderfully with:
- Greek Yogurt: The creamy texture of yogurt complements the chewy granola bars, creating a satisfying snack or breakfast option.
- Fresh Fruit: Slices of banana or berries provide a burst of freshness that enhances the overall flavor experience.
- Nut Butter: Spreading almond or peanut butter on top adds protein and healthy fats, making for a more filling treat.
Feel free to pair it with your favorite sides for a personalized meal!

Make Ahead and Storage
- Make Ahead: You can prepare the homemade granola bars in advance by mixing the ingredients and pressing them into a pan. Chill them in the fridge for at least an hour before cutting into bars. This can be done up to one week ahead.
- Storing: Store leftover granola bars in an airtight container at room temperature for up to one week. For longer storage, wrap each bar individually in plastic wrap and freeze them for up to three months.
- Reheating: If you prefer warm granola bars, simply place them in the microwave for about 10-15 seconds. Alternatively, you can warm them in a preheated oven at 350°F (175°C) for about five minutes to maintain their texture.
Looking for More Tasty Options?
Innovative Ways to Upgrade Your Snack Bars
Use the Wrong Oats
One common mistake when making homemade granola bars is using the wrong type of oats. Steel-cut oats or instant oats may not yield the desired chewy texture. Instead, opt for rolled oats, which provide the perfect balance of chewiness and crispness. Rolled oats absorb moisture well and hold their shape during baking. This choice ensures your bars remain sturdy yet tender. Additionally, avoid quick oats as they can turn mushy, compromising the overall texture. Proper oat selection is crucial to achieving delicious homemade granola bars that everyone will love.
Skipping the Binding Agents
Another key mistake is neglecting binding agents in your recipe. Ingredients like honey, maple syrup, or nut butter are essential for holding your granola bars together. Without these sticky components, the mixture may crumble when cut into bars, leading to a frustrating experience. Ensure you measure these ingredients accurately and combine them thoroughly with dry components. The right amount helps create a cohesive mixture that sets well in the pan while retaining a chewy texture. Remember, binding agents play a vital role in creating successful homemade granola bars.
Overbaking Your Bars
Overbaking is a frequent error that can ruin your homemade granola bars. While it may be tempting to leave them in the oven longer for extra crunch, doing so can lead to dry and crumbly results. Keep an eye on your bars while they bake; they should be golden brown but slightly soft in the center when you remove them from the oven. Allowing them to cool completely will help firm them up without compromising their texture. By avoiding overbaking, you’ll achieve perfectly balanced homemade granola bars every time.
Not Letting Them Cool Properly
Failing to let your homemade granola bars cool properly can lead to a sticky mess when cutting them into pieces. After baking, allow the bars to sit in the pan for at least 10-15 minutes before transferring them to a wire rack to cool completely. This step helps them firm up and makes slicing much easier. If you try cutting too soon, you’ll end up with uneven pieces that may fall apart easily. Cooling properly ensures you enjoy beautifully shaped and delicious homemade granola bars that are easy to handle.

FAQs
What ingredients do I need for homemade granola bars?
To make delicious homemade granola bars, you’ll need several key ingredients: rolled oats as the base, a binding agent like honey or nut butter, nuts or seeds for added crunch, and dried fruits for sweetness and flavor. You can also include chocolate chips or spices like cinnamon for extra taste. Customizing your recipe allows you to tailor it to your preferences while maintaining that perfect chewy consistency.
How long do homemade granola bars last?
Homemade granola bars typically last about one week at room temperature if stored in an airtight container. If you’d like them to last longer, consider refrigerating them; this can extend their freshness up to two weeks or even longer if frozen. Make sure to wrap each bar individually if freezing, so they remain fresh and ready for quick snacking whenever you need!
Can I customize my homemade granola bars?
Absolutely! One of the best aspects of making homemade granola bars is their versatility. You can customize the ingredients based on your dietary preferences or what you have on hand. Feel free to swap out different nuts, seeds, or dried fruits and adjust sweeteners according to taste preferences. Just ensure any substitutions maintain similar moisture levels so that your final product achieves that desired chewy texture.
Are homemade granola bars healthy?
Homemade granola bars can be healthier than store-bought versions since you control all ingredients used in your recipe. By selecting wholesome components like whole grains, natural sweeteners, and healthy fats from nuts and seeds, you can create nutritious snacks rich in fiber and protein without unnecessary additives or preservatives often found in packaged products.
Craving Something New? Try This
Final Thoughts on Your Granola Creation
In conclusion, making homemade granola bars is a rewarding experience that allows you to create nutritious snacks tailored to your taste preferences while avoiding common pitfalls such as using incorrect oats or failing to incorporate binding agents effectively. By taking care during preparation—ensuring proper baking times and allowing adequate cooling—you’ll achieve perfectly structured treats every time. Don’t forget about customization options; whether you’re adding chocolate chips or swapping out nuts for seeds, there are endless possibilities! Enjoy experimenting with flavors and textures as you craft delightful homemade granola bars that everyone will love.

Easy Homemade Granola Bars
Ingredients
Method
- Preheat your oven to 350°F (175°C) and line a baking dish with parchment paper.
- In a large bowl, mix together rolled oats, chopped nuts, and dried fruits until evenly combined.
- In another bowl, whisk together honey (or maple syrup) and nut butter until smooth.
- Pour the wet mixture over the dry ingredients and stir until everything is well coated.
- Transfer the mixture into the prepared baking dish and press down firmly to create an even layer.
- Bake for 20-25 minutes until golden brown around the edges. Allow to cool completely before slicing into bars.